
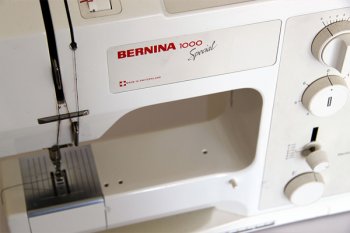
 Your sewing machine just sews, right? Wrong! It does so much more! There are some interesting and unusual embroidery techniques you must try out on your machine. Remember to test out on old fabrics! Trial and error is the best way to get to know your machine and how it works.
Photos via leighlalovesyou
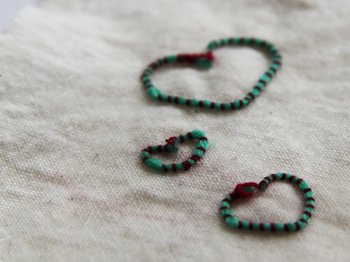
1. Couching
Couching involves attaching a laid yarn or thread onto fabric with small stitches in a similar or contrasting thread and adds texture to a piece of work. It is a technique traditionally done by hand, but did you know you can also couch with your sewing machine? It's easy!
How to:
1. Wind a thicker thread or thin yarn onto the bobbin and place a standard thread on the spool.
2. Change the tension of your bobbin case by adjusting the small screw so it is loose to allow the thicker thread to pass through the machine without getting caught. Remember to tighten the screw again once you have finished your couching.
3. Couching with your machine means your design will be stitched upside down. Remember to draw your design on the back of your fabric as your couched threads will come up from underneath.
5. Once complete, turn your fabric over to reveal your couching.
Machine settings
- Foot - Either standard foot or darning foot (personal preference)
- Tension - Standard for your machine bobbin, thicker thread, loosened screw (tension)
- Stitch length - personal preference
- Stitch width - 0
- Feed dogs - In action for standard foot or out of action for darning foot
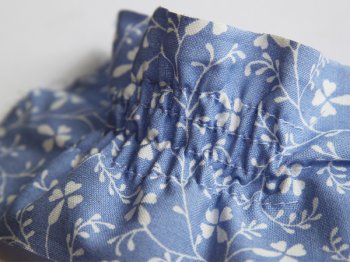
2. Smocking
 Smocking (or shirring) gathers your fabric in order to give it stretch. Historically created with thread, it is most commonly used in clothing such as dresses and blouses. However, when using your machine you use elastic for a fast and easy result. This technique is set up in a very similar way to couching.
Lighter fabrics work best for smocking and adding some steam with your iron at the end will encourage the elastic to pull in tighter.
1. By hand, wind your elastic thread around the bobbin ensuring it is not too tight or too loose and place a standard thread on the spool.
2. Change the tension of your bobbin case by adjusting the small screw so it is loose to allow the elastic thread to pass through the machine without getting caught. Remember to tighten the screw again once you have finished your smocking.
3. Similar to couching, your elastic will be on the underneath of the fabric. However, the front of your fabric will remain as normal, on the top.
4. Choose your stitch length preference. The longer the stitch, the greater the stretch. With the standard foot on and the feed dogs in action, stitch a straight line, keeping the fabric taut.
5. Repeat Step 4, ensuring your fabric remains flat and taut, to create as many rows as you like.
- Foot - Standard
- Tension - Standard for your machine bobbin, holding elastic, loosened screw (tension)
- Stitch length - Mid/Longest setting
- Feed dogs - In action
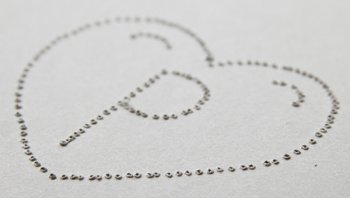
 3. Perforating
Probably the easiest technique of the list, perforation is great for paper crafts, such a scrapbooking or card making! For best results, work in reverse on thick paper or a thin card. This is also a great way to get kids stitching! By creating premade holes in different designs, they can learn to sew and embroiderer.
1. Set up the machine and remove all threads.
2. Place paper or a thin card under your machine needle and free-motion "stitch" your design.
3. Use a slow and controlled speed for even perforation.
- Foot - Darning foot or no foot
- Tension - N/A bobbin - empty
- Stitch length - Personal preference
- Feed Dogs - Out of action
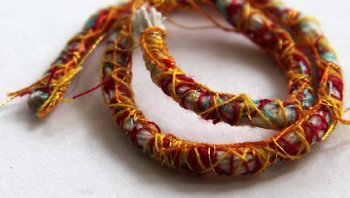
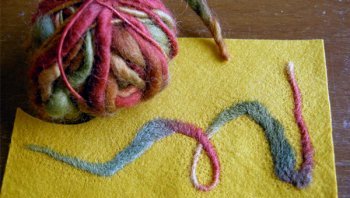
4. Thread decorating
Design your own yarn and thread with this easy machine method. Use your new funky threads for couching by hand or zigzag onto fabric with your sewing machine!
1. Set up machine as stated below. Placing a contrasting thread in the bobbin will give your brighter and more varied results.
2. Place a length of string, twine or yarn under the machine foot. I find having my machine with the feed dogs down and the darning foot on easiest. However, you can also work with the feed dogs in action with the standard foot.
3. With the largest stitch width on, sew as normal, pulling your string through the machine. The needle should land on either side of the string, wrapping as you go.
4. Build up layers of different colors until satisfied. Adding metallic threads can also create interesting effects.
- Foot - Either standard foot or darning foot
- Tension - Standard for your machine bobbin, standard, but try a contrasting thread color
- Stitch Length - Mid/longest setting
- Stitch Width - Widest setting
- Feed Dogs - Personal preference
Photo via
5. Needle felting
Needle felting takes two dry fibers and mattes them together to create one fabric. If you have an old sewing machine lying around, then this is a great new craft to take up. You can buy kits online to permanently change your old sewing machine into a needle felting machine. These machines use multiple needles at once to felt together your fabrics. Although I have never tried it myself, it all looks very exciting!
Share this Post
latest post
-
 What is the parts of Sewing machine? March 29, 2025
 -
 Where was the Sewing machine invented? March 9, 2025
 -
 Bargain Sewing Machines February 17, 2025
 -
 Singer Sewing Machine Outlet January 28, 2025
 -
 Sewing Singer Machine January 8, 2025
 -
 Who built the first Sewing machine? December 19, 2024
 -
 Singer Sewing Machine store Locator November 29, 2024
 -
 Compare Sewing machine Features November 9, 2024
 -
 Singer Sewing Machine in Bangladesh October 20, 2024